
So, you decided to give mobl a shot. That’s excellent news! Mobl is free software (licensed under an MIT license). There are three ways to download and get started with mobl. In all cases you need a recent version of Java installed:
- Download a copy of Eclipse with the mobl plugin-in preinstalled properly configured (a 275MB download):
- Eclipse + mobl for Windows 32-bit
- Eclipse + mobl for Windows 64-bit
- Eclipse + mobl for Mac 32-bit (10.5 Leopard and earlier)
- Eclipse + mobl for Mac 64-bit (10.6 Snow Leopard and up)
- Eclipse + mobl for Linux 32-bit
- Eclipse + mobl for Linux 64-bit
- Already have Eclipse? Install the plug-in from the update site
http://mobl-lang.org/update(uncheck the “Group items” checkbox). See below for more details. - Hate Eclipse and everything it stands for? There is also a command-line compiler.
Installing the mobl plug-in manually
Already have Eclipse installed? You can install the plug-in manually.
- Tweak the
eclipse.inifile for optimal Eclipse performance, as described below. - Install the mobl Eclipse plug-in.
- Build your first application!
1. Optimize your Eclipse install
To improve Eclipse performance and prevent it from crashing while working with mobl (for instance because the VM runs out of memory), it is recommended to tweak the Eclipse configuration a little bit. Sadly, this requires editing an old-fashioned eclipse.ini file. If you’re on Linux or Windows, this file will likely reside in the same directory as the eclipse.exe (or eclipse) executable. If you’re on Mac you’ll have to dig into the Eclipse.app directory. On my Mac the eclipse.ini file is located in /Applications/eclipse/Eclipse.app/Contents/MacOS/eclipse.ini.
Open this eclipse.ini file using a text editor and look for the line that says -vmargs. Before that line, make sure it says:
--launcher.XXMaxPermSize
256m
and after the -vmargs line add the following:
-ss16m
-Xss16m
-Xms200m
-Xmx1024m
This increases the maximum amount of memory that Eclipse can use to 1GB and increases the maximum stack size to 16MB, which is plenty. Save the file and launch Eclipse.
2. Install the mobl plug-in
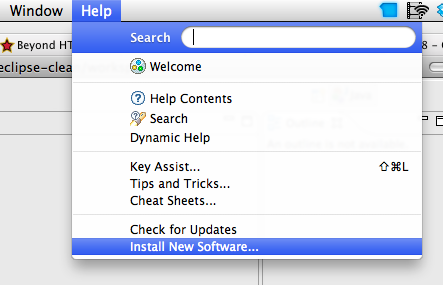
The default way to develop applications using mobl is using the mobl Eclipse plug-in, which also explains why you have been setting up Eclipse. Installing the mobl plug-in is simple. When Eclipse is running simply go to the “Help” menu and pick “Install new software…”
Then add the following update site:
http://mobl-lang.org/update
Then, if the “mobl editor” plug-in does not appear, uncheck “Group items by category”. Select to install mobl
editor, choose “Next”, “Accept” and “Finish”, let it download and restart. You can ignore the warning about unsigned content.
If you know what you are doing or want to help to develop, the following update site will install the nigthly build of the plugin:
http://hydra.nixos.org/job/mobl/master/updatesite/latest/download/2/site
3. Build your first application
Start a new mobl project. From the “File” menu, choose “New”, and then “Project…”.

From the list, pick “mobl project”.

Pick a project and application name for your project and click “Finish”. Your new project will now be created. The project’s main application file will automatically be openend. The generated application defines a single screen, the root screen, which is the screen that will appear when the application is launched. Change the header control to say “Hello world!” and save the file. The changed root screen will now look as follows:
screen root() {
  header("Hello world")
}
Saving the application the first time may take a few seconds, as it will compile all the libraries that it is using. The result of the save is a newly created www/ folder in your project. This folder will contain a number of .js, .css, .html and other resources. The contents of the www directory contains your entire application and can be deployed as-is.
Running your first application
Due to browser constraints, your application has to be served by a web server to work properly. If you can already run a webserver on your computer, you can copy or symlink the www/ folder into your web server’s folder. However, for development, the recommended option is to use this simple webserver: fileserver.jar to run a
simple web server and serve the files through that. fileserver.jar is an extremely simple web server written in Java. After downloading, and copying it into your project directory (or anywhere else for that matter), it can be invoked through the command line as follows:
java -jar fileserver.jar 8888 /path/to/www
Where 8888 is the port that the server will run on, and /path/to/www the path to your www/ directory. If you copied the fileserver.jar into your project directory, you can call it using:
java -jar fileserver.jar 8888 www
Now, to test your application, open the URL: http://localhost:8888/firstapp.html (or whatever.html, depending on the name of your application). You can test your application using any Webkit browser. For instance, Safari, Google Chrome, or of course, an iOS device’s browser or Android browser. Either running on an actual device (make sure to replace localhost with the IP of your computer), or a simulator. The result should look something like this:

Congratulations, you just created your very first mobl application.